
Reference
This document goes through the command-line tools, describing how to perform specific tasks such as creating a storage network, contributing storage capacity, inviting users to join a drive and more.
Introduction
Terminology
The Infinit command-line tools are composed of several binaries, each dealing with a specific resource or object.
A user represents the entity performing operations on files, directly or indirectly. Every user possesses an RSA key pair that is used to identify him/her. A user can create a network which represents the interconnection of computing resources that will compose the storage infrastructure. A silo is a storage resource, local or remote, that can be connected to a device to support part of the overall storage load. Finally, several volumes --- i.e. logical drives --- can be created within a network.
The Hub is a cloud service whose role is to ease the process of discovery, sharing and more.
Home
All the configuration files Infinit creates and uses are located in the $INFINIT_HOME directory which is, by default, set to $HOME. More precisely, Infinit stores configuration files, cache files etc. in the directories $INFINIT_HOME/.local/{state,share}/infinit/filesystem following the XDG Base Directory Specification.
Please refer to the environment variables documentation should you want to specifically define where the configuration files, journal operations etc. are stored.
As an example, $INFINIT_DATA_HOME references the directory that contains the configuration files such as user identities, network descriptors etc. The environment variable is, by default, set to $INFINIT_HOME/.local/share/infinit/filesystem/ and can be very easily changed by either modifying your shell configuration or by setting it manually:
$> export INFINIT_DATA_HOME="/some/where/"
Nomenclature
All the command-line tools rely on the same terminology when it comes to options and arguments. As an example, most objects have modes named create, list, fetch, etc.
For more information on the modes and options provided by a binary, do not hesitate to rely on the ‑‑help option. Note that the help is relative to the options already provided.
For example, the help for infinit user displays the general options available: export, create, import, list, etc.:
$> infinit user --help
Usage: ./_build/macosx64/bin/infinit user [MODE|--help]
Infinit user management utility.

Modes:
  create     Create a user
  delete     Delete local user
  export     Export local user
  hash       Get short hash of user's key
  import     Import local user
  fetch      Fetch users from https://beyond.infinit.sh
  list       List local users
  login      Login user to https://beyond.infinit.sh
  pull       Pull a user from https://beyond.infinit.sh
  push       Push a user from https://beyond.infinit.sh
  signup     Create and push a user to https://beyond.infinit.sh

Options:
  -h, --help                show this help message
Each mode of each binary has its own help as well. For example the help when invoking the ‑‑create mode of infinit user shows the options associated with creating a user:
$> infinit user create --help
Usage: infinit user create [OPTIONS]
Create a user

Options:
  -h, --help                show this help message
      --compatibility-version arg  compatibility version to force
  -s, --script              suppress extraneous human friendly messages and use JSON output
  -a, --as arg              user to run commands as (default: alice)
  -n, --name arg            name of the user to create (default: alice)
      --description arg     user description
  -k, --key arg             RSA key pair in PEM format - e.g. your SSH key
  -e, --email arg           user email
      --fullname arg        user full name
  -P, --password arg        password to authenticate with https://beyond.infinit.sh
  -l, --ldap-name arg       user LDAP distinguished name
  -o, --output arg          file to write the user to
      --push-user           push user to https://beyond.infinit.sh
  -p, --push                push user to https://beyond.infinit.sh
      --full                include private key (do not use unless you understand the implications
Every command is structured the same way: invoke the infinit binary with first the object type (user, volume, etc.) then the action/mode (e.g., create, pull, list, etc.), and then options and arguments (such as ‑‑name, ‑‑pull and so forth).
The name/identifier of the object on which you wish to operate can be specified through the ‑‑name option or simply by providing it outside of any option. As such both commands below are equivalent:
$> infinit volume push --name personal
$> infinit volume push personal
Hub
All objects (users, silos, networks, volumes etc.) are created locally by default with no server involved. The creation process may generate one or more files and store them in the $INFINIT_HOME directory, more specifically in the subdirectory $INFINIT_DATA_HOME.
The command-line tools however provide a way to rely on the Hub for certain operations in order to simplify some administrative tasks such as inviting a user to a drive, sharing the volumes created within a network, moving the user identity to another of your devices and so on. In addition, some functionalities such as the consumption of storage capacity in a network are only available through the Hub. As a rule of thumb, we advise you to always rely on the Hub, unless you know exactly what you are doing.
The use of the Hub can be activated through specific options, mostly ‑‑push, ‑‑fetch and ‑‑pull. The ‑‑push option pushes an object on the Hub for other users to retrieve it. The ‑‑pull option does the exact opposite, removing the object from the Hub. Finally, the ‑‑fetch option retrieves a resource from the Hub, e.g. a network descriptor, and stores it locally in the $INFINIT_DATA_HOME directory.
One can decide to either create objects locally before pushing them to the Hub or to perform both tasks through a single action by specifying ‑‑push option when invoking the command.
Note that some binaries operate in hub mode by default. For instance the infinit drive binary would not make sense without the Hub since its role is to bridge the gap between a low-level storage infrastructure and potential non-tech-savvy users.
IMPORTANT: This document mainly covers flows involving the Hub. For users wanting to use Infinit in a pure decentralized environment, the ‑‑push/‑‑fetch operations must be replaced with ‑‑export/‑‑import operations and the resulting files must be manually shared with other users and moved between devices. You will sometimes need to provide additional information such as the IP address of bootstrap nodes in order to discover the other nodes of a network.
Doctor
The infinit doctor mode provides an easy way to check the health of your local environment: configuration files, version of the software, networking capabilities etc. To run all available tests, the all option can be used.
$> infinit doctor all
CONFIGURATION INTEGRITY:
[OK] Storage resources
[OK] Networks
[OK] Volumes
[OK] Drives
[OK] Leftovers

SYSTEM SANITY:
[OK] Username
[OK] Space left
[OK] Environment
[OK] Permissions
[OK] FUSE

CONNECTIVITY:
[OK] Connection to https://beyond.infinit.sh
[OK] Local interfaces
[OK] Nat
[OK] UPNP
[OK] Protocols

All good, everything should work.
Connectivity
To ensure that a client has the required networking access to use Infinit, the connectivity option runs several tests:
- Ensure HTTPS access to the Hub.
- Check connectivity with a remote server using TCP and UDP.
- Check for UPnP availability.
- Check if the host is behind a NAT.
Sanity
A system sanity check can be run using the sanity option. This will check things like folder permissions, amount of free space and if there are any Infinit environment variables set.
Integrity
To ensure that the local infrastructure descriptors are valid, the integrity option can be used. This will do things like check that networks used by volumes have been fetched and linked to, that the compatibility version of the networks work with the current binaries, etc.
Networking
Finally, doctor has a networking mode to test connectivity and transfer speed between nodes.
NOTE: For now, nodes must have a public IP address for the test to work.
Device A$> Infinit doctor networking
Server mode (version: 0.8.0):

To perform tests, run the following command from another node:
$> Infinit doctor networking --tcp_port 55848 --utp_port 41275 --xored_utp_port 54723 --host <address_of_this_machine>
Device B$> Infinit doctor networking --tcp_port 55848 --utp_port 41275 --xored_utp_port 54723 --host 127.0.0.1
Client mode (version: 0.8.0):
TCP:
  Upload:
    215ms for 5.2 MB (24.4 MB/sec)
  Download:
    219ms for 5.2 MB (23.9 MB/sec)
UTP:
  Upload:
    377ms for 5.2 MB (13.9 MB/sec)
  Download:
    293ms for 5.2 MB (17.9 MB/sec)
xored UTP:
  Upload:
    364ms for 5.2 MB (14.4 MB/sec)
  Download:
    299ms for 5.2 MB (17.5 MB/sec)
User
The infinit user mode allows one to create a user identity, push it to the Hub so that it can be referenced by other users and perform other user based operations.
Create a user
A user is not much more than an RSA key pair that will be used to sign and encrypt data. The following creates a user, automatically generating a new RSA key pair.
Note that the name of the user is deduced from the system if you do not specify a name through the ‑‑name option or the $INFINIT_USER environment variable.
$> echo $USER
alice
$> infinit user create
Generating RSA keypair.
Locally generated user "alice".
You may want to specify the RSA key pair to use rather than generating a new one. You can use the ‑‑key option to reference a PEM-formatted RSA private key (e.g your SSH RSA key) and Infinit will create a user identity based on it.
$> infinit user create --name alice --key ~/.ssh/id_rsa
Key passphrase: ********
Locally generated user "alice".
WARNING: The user identity file is the equivalent of an SSH key file and must therefore be kept private at all times.
Sign up on the Hub
To register on the Hub, you can either use the push option when creating your user, push the user once it has been created locally or sign up directly on the Hub.
Push an existing user to the Hub
To push an existing user, simply invoke infinit user with the push mode. You can also specify an optional email address using ‑‑email but needless to say that this email address will never be shared with third parties and will solely be used for Infinit to communicate news of its file storage platform.
IMPORTANT: Given the critical nature of the user identity, we strongly advise you to read the Log in on another device section in order to completely understand the ramifications of the options used when pushing your user.
$> infinit user push --name alice --fullname "Alice"
Remotely saved user "alice".
Create and push user on the Hub
Unfortunately, since names are unique, your user name may already be taken on the Hub, in which case the operation will fail. The action signup has been introduced to overcome this problem, performing the equivalent of create --push atomically, making sure that the user is created locally and remotely at once.
We advise users to sign up to the Hub before performing other operations to avoid complications:
$> infinit user signup --name alice --fullname "Alice"
Generating RSA keypair.
Remotely saved user "alice".
Fetch a user
One can very easily fetch the public identity of another user through the fetch mode:
$> infinit user fetch --name bob
Fetched user "bob".
List users
The list of users kept locally can contain both user identities that you created and therefore own as well as public identities of users that you fetched from the Hub for instance.
$> infinit user list
alice: public/private keys
bob: public key only
Pull a user
To remove a user from the Hub, you can use the pull mode. The ‑‑name option specifies which user to pull while the ‑‑as option specifies which user should sign the pull request. Currently a user can only pull themself but in the future there will be the concept of administrator users who can pull other users.
$> infinit user pull --as alice --name --alice
Remotely deleted user "alice".
To pull all objects that the user has pushed to the Hub along with the user itself, you can specify the ‑‑purge option:
$> infinit user pull --as alice --name --alice --purge
Remotely deleted user "alice".
Delete a user
Users can be locally deleted using the delete mode. If the user has a private key, you will be prompted before the user is deleted as losing a user's public key will mean that you can no longer perform actions as that user. This includes pulling the user or any objects they have pushed to the Hub. To avoid being prompted, the ‑‑force option can be used.
$> infinit user delete --name alice
WARNING: The local copy of the user’s private key will be removed.
WARNING: You will no longer be able to perform actions on the Hub
WARNING: for this user.

Confirm the name of the user you would like to delete: alice
Locally deleted user "alice".
To be symmetric with the ‑‑push option of the create mode, the delete mode is provided with a ‑‑pull option. This will remove the user both on the Hub and locally.
$> infinit user delete --as alice --name alice --pull
WARNING: The local copy of the user’s private key will be removed.
WARNING: You will no longer be able to perform actions on the Hub
WARNING: for this user.

Confirm the name of the user you would like to delete: alice
Remotely deleted user "alice".
Locally deleted user "alice".
There is also the option ‑‑purge to locally remove all objects created by the user which can be combined with pull to remove all objects owned by the user from the Hub.
Credentials
The infinit credentials binary manages the credentials for your cloud services. Cloud services, such as Amazon Web Services, Google Cloud Storage and Dropbox, can be used to add storage to your networks. Infinit considers these cloud services as basic and unprivileged datastores that are used to store blocks of encrypted data.
_NOTE: Because this binary requires the Hub for some types of credentials (such as Dropbox and Google), you may need to register your user on the Infinit Hub. For more information, please refer to the User section, more specifically how to Sign up on the Hub._
Add credentials
The basic process for adding credentials consists in using the add option as shown in the example below with Amazon Web Services:
$> infinit credentials add --aws --name s3-user
Please enter your AWS credentials
Access Key ID: AKIAIOSFODNN7EXAMPLE
Secret Access Key: ****************************************
Locally stored AWS credentials "s3-user".
However, the procedure to follow differs with every cloud service. It is therefore advised to read the guide associated with the cloud service you intend to connect:
 Amazon S3
 Google Cloud Storage
NOTE: Do not hesitate to vote for and/or request the cloud services you would like to be supported in the future.
List credentials
At any point, you can list your local credentials using the list option:
$> infinit credentials list
AWS:
  AKIAIOSFODNN7EXAMPLE: s3-user
GCS:
  alice@company.com: Alice
Delete credentials
Credentials can be locally removed using the delete mode:
$> infinit credentials delete --aws --name s3-user
Locally deleted credentials "s3-user".
Silo
The infinit silo mode allows for the definition of silos. Such silos can be local — storing blocks of data on a locally available file system — or remote in which case the blocks of data are stored through a cloud service API for instance.
Note that silos are device-specific. As such, resources cannot be pushed to the Hub since they only live locally.
Create a silo
To create a silo, simply specify the create option along with the type of the silo. In the example below, a silo is created on top of an existing local file system by storing the blocks of encrypted data in a specific directory specified that can be specified through the ‑‑path option:
$> infinit silo create filesystem --capacity 2GB --name local
Created storage "local".
However, the process differs depending on the nature of the silo. Please follow the guide that is specific to the type of storage you want to create:
NOTE: Do not hesitate to vote for and/or request the types of storage backends that you would like to see supported in the future.
Delete a silo
You can locally delete a silo using the delete mode. For filesystem silos, you can clear their contents using the ‑‑clear-content option.
Using ‑‑purge will unlink all networks that use the storage locally.
Network
With the infinit network mode you are able to create overlay networks, configure the way the distributed hash table behaves and much more.
Create a network
The example below creates a network named "cluster" which aggregates the silos controlled by the users involved in this network.
The network can be configured depending on the requirements of the storage infrastructure the administrator is setting up. For instance, the number of computing devices could be extremely small, the owners of those computers could be somewhat untrustworthy or their machines could be expected to be turned on and off throughout the day. To cater for this the network parameters can be tuned: the overlay's topology, the replication factor, the fault tolerance algorithm, etc.
The following creates a storage network, relying on the default overlay network with a replication factor of 3. In addition, the administrator decides to contribute two silos to the network on creation.
$> infinit network create --as alice --replication-factor 2 --storage local --storage s3 --name cluster
Locally created network "alice/cluster".
The overlay network (i.e the algorithm connecting the nodes together) can be configured. Below are listed some of the overlay networks available:
- Kalimero: Simple test overlay supporting only one node.
- Kelips: Overlay with support for node churn. The k argument specifies the number of groups to use, each group being responsible for 1/kth of the files. See the reference paper "Kelips: Building an Efficient and Stable P2P DHT through Increased Memory and Background Overhead" for more information.
- Kouncil: Fully connected overlay that stores the whole block address book in memory, and broadcast updates to all nodes when a new block is created.
An administrator can be set for the network. This allows the given user either read or read/write permissions for all files in all volumes on the created network. To enable this feature, the ‑‑admin-r USER or ‑‑admin-rw USER arguments respectively.
Push a network
You can now push a network onto the Hub for other users to retrieve it. Note that the easiest way is always to append the push option to the network creation command to perform both the creation and publication actions at once.
As with the other utilities, you can otherwise push the network to the Hub with the push option:
$> infinit network push --as alice --name cluster
Remotely saved network "alice/cluster".
You can also manipulate networks without relying on the Hub. Please refer to the ‑‑export and ‑‑import options in this case.
List the networks
You can list the networks that you have locally using the list mode. Do not forget that you may need to fetch the networks from the Hub in order to be up to date:
$> infinit network fetch --as alice
Fetched networks for user "alice".
$> infinit network list
alice/cluster
Link a device to a network
Before a network can be connected to, it must be linked to a user on the device. When creating the network with the create option, the network is linked automatically.
Upon linking to (or creating) the network, storage can be contributed to it using the ‑‑storage argument. This will be demonstrated below.
There are two distinct cases for linking networks which depend on the given user's relation to the network: the user is the owner on another device or the user is an invitee.
As the owner
As the owner of the network, the system automatically recognizes you and allows you to link any of your devices to the network. The process in this case is straightforward.
In the example below, Alice connects one of her other devices and contributes storage capacity from her personal Network-Attached Storage (NAS).
$> infinit network link --as alice --name cluster --storage nas
Linked device to network "alice/cluster".
NOTE: Keep in mind that the action of linking a device to a network must only be performed once per user on every new device.
As an invitee
In this case, you should have received, through the Hub or manually, an invitation to join a network created by someone else. Such invitations are called passports and allow users to link their devices to the network they've been allowed to join.
In order to link a device to a network, you must first retrieve its descriptor. This network descriptor can be fetched from the Hub through a single command:
$> infinit network fetch --as bob --name alice/cluster
Fetched network "alice/cluster".
You now have both the network descriptor and a passport locally allowing you to link new devices to it. Let's link Bob's current device to Alice's "cluster" network. Note that one can decide to contribute additional storage capacity through the ‑‑storage option.
$> infinit network link --as bob --name alice/cluster
Linked device to network "alice/cluster".
NOTE: This process must be performed on each new device, proving that the user has indeed been allowed to join the network (via the passport) and that this device belongs to the user.
Run a network
Running a network means launching the Infinit software to act as a node in the storage network, also known as a "server". For a node to act as a server, it must contribute some storage capacity.
If you want your node to also provide a POSIX-compliant file system interface, please consider running/mounting a volume.
In order to run a network, just use the option run. Note that the ‑‑publish option tells the binary to rely on the Hub to ease the process of connecting to the network by providing you with the endpoint of bootstrap nodes while publishing your own endpoint for other nodes to find you as well:
$> infinit network run --as alice --name cluster --publish
Running network "alice/cluster".
Fetched endpoints for "alice/cluster".
Remotely pushed endpoints for "alice/cluster".
...
Inspect a running network
Once a network is running, you can easily get information about it using the ‑‑inspect option. This information includes things such as which peers are connected to, data redundancy information and the type of consensus used.
$> infinit network inspect --name alice/company --all
{
    "consensus" : {
        "node_timeout" : "600s",
        "type" : "paxos"
    },
    "overlay" : {
        "id" : "0x0000000000000000000000000000000000000000000000000000000000000000",
        "type" : "kouncil"
    },
    "peers" : [
        {
            "endpoints" : [
                "10.0.0.1:45602",
            ],
            "id" : "0x0000000000000000000000000000000000000000000000000000000000000001"
        },
        {
            "endpoints" : [
                "10.0.0.2:34458",
            ],
            "id" : "0x0000000000000000000000000000000000000000000000000000000000000002"
        }
    ],
    "protocol" : "all",
    "redundancy" : {
        "desired_factor" : 3,
        "type" : "replication"
    }
}
Upgrade a network
Every node, no matter the version of its Infinit software, will always run in a compatibility mode defined by the version of the network. As such, assuming all the clients and servers are operating in version 0.5.4 while the network is configured in 0.3.0, all the nodes would behave as if running the version 0.3.0.
Upgrading a network, say from 0.3.0 to 0.5.0, allows nodes to benefit from the functionality introduced between those versions. The process of upgrading a network goes through several steps, from updating the network descriptor to distributing it to the clients and servers to finally restarting the nodes to take the new descriptor into account.
The complete procedure is detailed in the Upgrading a network guide.
Pull a network
Networks can be pulled from the Hub using the pull mode. If the ‑‑purge option is used, all volumes and drives which rely on the given network and belong to the user will be pulled as well.
Delete a network
To delete a network locally, the delete mode is used. This can be used in conjunction with the ‑‑purge and ‑‑pull options to, respectively, delete volumes and drives that depend on the network locally and pull them from the Hub. Note only volumes and drives owned by the user can be pulled from the Hub.
Network administrators
Networks can be assigned administrators who have either read only or read/write access to all blocks (and thus implicitly files and folders) stored on a network. As Infinit is completely decentralized there are two limiting factors: all users must have the same network descriptor and changes to administrators are not retroactive.
On creation of a network, individual administrators can be added using the ‑‑admin-r and ‑‑admin-rw arguments as shown in the example that follows:
$> infinit network create --as alice --storage local --admin-r bob --name administrated-cluster --push
Locally created network "alice/administrated-cluster".
Remotely saved network "alice/administrated-cluster".
Once a network has been created, administrator users and groups can be added using the update action. Note that as groups are stored internally in the network DHT, you will need to have created and mounted a volume on the network to add an administrator group.
$> infinit network update --as alice --admin-rw charlie @managers --mountpoint /path/to/mounted/volume/on/network --push
Updated linked network "alice/administrated-cluster".
Updated network "alice/administrated-cluster".
Remotely updated "alice/adminstrated-cluster".
INFO: Changes to network admins do not affect existing data:
INFO: Admin access will be updated on the next write to each
INFO: file or folder.
IMPORTANT: All storage nodes and users who have already run the network will need to fetch the new network descriptor and relaunch the network. Changes to administrator rights occur on the next write to any given file or folder.
Similarly, administrators can be removed using the ‑‑admin-remove argument.
$> infinit network update --as alice --admin-remove bob --mountpoint /path/to/mounted/volume/on/network --push
Updated linked network "alice/administrated-cluster".
Updated network "alice/administrated-cluster".
Remotely updated "alice/adminstrated-cluster".
INFO: Changes to network admins do not affect existing data:
INFO: Admin access will be updated on the next write to each
INFO: file or folder.
Passport
The infinit passport mode is used to control which users are allowed to connect to a network, granting him/her the right to link devices, contribute silos etc.
Create a passport
To allow another user to join a network and link devices, you must issue a passport. In order to reference the user to invite, you first need to obtain his/her user public identity.
Let's say that you want to invite the user "bob" to your network. First you need to fetch his identity from the Hub (or retrieve it manually if operating without the Hub, see -export and import):
$> infinit user fetch --as alice --name bob
Fetched user "bob".
The passport that you are about to create will be sealed, allowing only Bob to connect new devices to the network:
$> infinit passport create --as alice --network cluster --user bob
Locally created passport "alice/cluster: bob".
You can restrict the network permissions given by a passport by creating it with the following options:
‑‑deny-write: Passport grants read-only access to the network. Note that this option supersedes the ACL of a volume and that a storage node with this flag will not be able to rebalance blocks.‑‑deny-storage: Passport does not allow user to contribute any storage to the network.
Now that the passport has been created, read the Distribute a passport section to learn how to distribute it to the invited user.
List the passports
You can list both the passports you've created for other users to join your networks and the passports issued by other users for you to join their networks:
$> infinit passport list --as alice
alice/cluster: bob
Distribute a passport
Once the passport has been locally created, you must distribute it to the invited user for him/her to be able to join your network.
The easiest way to do this is to rely on the Hub, by appending the push option when creating the passport; see the Create a passport section.
You can otherwise push a local passport by invoking the push action option as shown below:
$> infinit passport push --as alice --network cluster --user bob
Remotely saved passport "alice/cluster: bob".
If you are using the pure decentralized environment i.e. without the Hub, you will need to manually export the passport and transmit it to the invited user in which case you should refer to the export and import options.
IMPORTANT: Be aware that the invited user will not be notified that there is a new passport for him/her to join your network. The invited user could detect this by fetching his/her passports and noticing a new one but that's about it. In order to speed things up, you should probably inform him/her through the medium of your choice: chat, email, carrier pigeon or else.
Receive a passport
You can fetch your passports from the Hub in order to refresh the local snapshots using the fetch option:
$> infinit passport fetch --as bob
Fetched passports for user "bob"
$> infinit passport list --as bob
alice/cluster: bob
NOTE: The infinit passport mode also provides options to fetch all the passports for a specific user or for a specific network.
That's it, you will now be able to link devices to the networks these passports allow you to.
Delegate the creation of passports
The network administrator may not want to be the only user to be able to issue passports, because he is not always connected for instance. A special type of passport has been introduced to delegate the process of passport creation.
The process of delegation is performed in two steps. The first is to create the passport with the ‑‑allow-create-passport flag:
$> infinit passport create --as alice --network cluster --user bob --allow-create-passport --push
Locally created passport "alice/cluster: bob".
The second is to register the user's public key.
IMPORTANT: This can only be done once you have created a volume on the network as you will be required to mount the volume and use the infinit acl mode to register the user.
$> infinit acl register --network cluster --user bob --path /path/to/mountpoint
Bob can now fetch the new passport, at which point he will in turn be able to issue passports for other users to connect to the network.
Volume
On top of the distributed storage layer i.e. the network, one can create a volume also known as logical drive. A volume is represented by the address of its root directory. While centralized file systems store this address in a specific block known as the superblock, Infinit uses a file located in the $INFINIT_HOME directory which describes the volume.
Note that several volumes can be created on the same network, which is analogous to partitions on the same hard disk drive.
Create a volume
The command below creates a volume on a network. You can specify the default mount point for the volume through the ‑‑mountpoint option even though the following example does not:
$> infinit volume create --as alice --network cluster --name shared --block-size 1024
Locally created volume "alice/shared".
NOTE: You may have noticed that the name of the network is sometimes prepended with the username of its owner e.g "alice/cluster". This fully-qualified name distinguishes objects that you own from the ones that you don't. When manipulating objects you own, you will not need to use the fully-qualified name as the command-line tools will automatically search in the user's namespace.
Default permissions
A volume can be created with default permissions of either read-only or read-write. These permissions apply to anyone who has a passport for the network. Such permissions are quite handy when one wants to create a collaboration space in which everyone trusts each other for instance.
$> infinit volume create --as alice --network cluster --name shared --default-permissions rw
Locally created volume "alice/shared".
NOTE: The one exception to this is if a user has a passport with the ‑‑deny-write flag. In this case, the user is not authorized to create blocks in the underlying network and as such will not be able to write (create/modify/delete files or folders) to the volume even with default read-write permissions.
Push a volume
A volume often needs to be shared with the other users in the network. As with the other resources, the easiest way to do this is to rely on the Hub, either using the push option on volume creation or by pushing the volume as a separate action:
$> infinit volume push --as alice --name shared
Remotely saved volume "alice/shared".
NOTE: You may want to keep your volume hidden from the users on a network, in which case you could omit this step and distribute its descriptor using the export and import options.
List the volumes
You can list the volumes that you have local descriptors for with the ‑‑list option. Remember that you can also fetch the volumes on your networks which have been pushed to the Hub:
$> infinit volume fetch --as alice
Fetched volumes for user "alice".
$> infinit volume list
alice/shared: network alice/cluster
Mount a volume
Mounting an Infinit volume is very similar to mounting any other file system. As usual, there are two ways to achieve this, either by relying on the Hub as a helper or to do it manually in which case you will need to specify the host and port of some bootstrap nodes for your device to discover the nodes in the network.
Note that if you have been invited to join the network, you will need to fetch the volume before being able to mount it. Refer to the List the volumes section in this case.
The following command mounts an Infinit file system. If a volume is being mounted for the first time, the ‑‑allow-root-creation option must be passed so that the volume root block is written. Note that the ‑‑publish option tells the binary to rely on the Hub to ease the process of connecting to the underlying network by providing you with the endpoint of bootstrap nodes while publishing your own endpoint for other nodes to find you as well:
$> infinit volume mount --as alice --name shared --mountpoint /mnt/shared/ --allow-root-creation --publish
Running network "alice/cluster".
Fetched endpoints for "alice/cluster".
Running volume "alice/shared".
...
The ‑‑mountpoint option could be omitted if a default mount point was provided at the volume's creation.
NOTE: There are a number of options that can be used to alter the behavior of the file system such as determining the size of the cache, activating asynchronous operations for better performance, etc. Invoke the ‑‑help option to learn more.
When using a completely decentralized environment, the ‑‑peer option provides the binary one or more bootstrap nodes needed to discover the underlying network.
Once the volume is mounted, one can interact with the file system through common UNIX built-ins and binaries as for any other file system:
$> ls /mnt/shared/
$> echo "everything is" > /mnt/shared/awesome.txt
$> cat /mnt/shared/awesome.txt
everything is
IMPORTANT: It is possible that the volume owner didn't grant you access to the root directory, in which case you would get a "Permission Denied" error when listing the mount point. In this case, request that the volume owner grant's you access.
Pull a volume
To pull a volume from the Hub, the pull mode is used. When combined with the ‑‑purge option, drives that depend on the volume that are owned by the user are also pulled.
Delete a volume
To locally delete a volume, the delete mode is used. This can be used in conjunction with the ‑‑purge and ‑‑pull options to, respectively, delete drives that depend on the volume locally and pulls the dependent drives and volume from the Hub. Note that the volume and drives will only be pulled if the user is the owner.
Access Control List
Having joined a volume does not mean that you have the required permissions to browse the files and directories in it. As with most file system, in order to access, edit and/or delete a file, the owner must first grant you the permission to do so.
Unlike other file systems, Infinit provides advanced decentralized (i.e. without relying on a centralized server) access control mechanisms that allow any user to manage permissions on his/her files and directories.
The owner of a volume is automatically granted access to its root directory. It is then his/her responsibility to manage the permissions on the root directory for other users to use the volume.
Note that most access control actions use POSIX mechanisms such as standard permissions and extended attributes. The infinit acl mode can be considered as a wrapper on top of extended attributes which allows one to manipulate the ACL of an Infinit volume.
Grant/revoke access
In order to grant or revoke access to a file or directory, one uses the infinit acl mode, providing the path to the object to manage and the permissions to apply.
The following grants Bob the permissions required to read and write the root directory of Alice's volume mounted to /mnt/shared/.
$> infinit acl set --path /mnt/shared/ --mode rw --user bob
NOTE: The infinit acl mode provides additional options to better manage hierarchical permissions. Do not hesitate to rely on the help to learn more.
Once the command has been run, Bob will be able to read and write files/directories in the root directory of Alice's "shared" volume.
Inheritance
ACL inheritance is a mechanism that sets the ACL of newly created files and directories to that of their parent directory. It can be enabled or disabled on a per-directory basis using the ‑‑enable-inherit and ‑‑disable-inherit options:
$> infint-acl set --path /mnt/shared --enable-inherit
If ACL inheritance is disabled, newly created files and directories can only be accessed by their owner. If enabled, all the ACLs set on the parent directory are copied to the new object, including the inheritance flag for directories.
World-readability/writability
By default, files and directories can only be read/written by users present in the object's ACLs. It is possible to flag a file/directory as world-readable (everyone can read it) or world-writable (everyone can modify it).
The chmod UNIX binary can be used to set this. The following example sets a file as world-readable before making it world-writable as well. The ls -l command displays a file as world-readable/write through the others category (the last three rwx indicators).
$> ls -l /mnt/shared/awesome.txt
-rw-------  1 alice  users     14B Jan 20 16:55 awesome.txt
$> chmod o+r /mnt/shared/awesome.txt
-rw----r--  1 alice  users     14B Jan 20 16:55 awesome.txt
$> chmod o+w /mnt/shared/awesome.txt
-rw----rw-  1 alice  users     14B Jan 20 16:55 awesome.txt
NOTE: The option ‑‑others-mode can also be used in the infinit acl mode to set and list the permissions associated with 'everybody'.
List permissions
Every user with the volume descriptor and read permissions can consult the Access Control List (ACL) associated with a file system object:
$> infinit acl list --path /mnt/shared/awesome.txt
/mnt/shared/awesome.txt:
     alice: rw (owner)
     bob: r
NOTE: To list permissions of files and folders on macOS to which you do not have access, you will need to execute the command with sudo. This will be fixed in a later release of Infinit.
POSIX mode
Since the Infinit access model is ACL based, the POSIX file mode as displayed by ls -l differs from what you might expect:
$> ls -l /mnt/shared/
total 64
drwx------  1 alice  staff     0B Jan 20 17:15 Engineering
-rw-------  1 alice  staff    14B Jan 20 16:59 awesome.txt
One must take into account that:
- User and group IDs are set to the user who mounted the file system if he/she has read or write access to the file. Otherwise they are set to root. Changing them (using chown) has no effect.
- User read/write access mode (u+r and u+w) are set according to the ACLs, properly reflecting what operations the user who mounted the file system is allowed to perform. Changing these flags has no effect.
- User execute access mode can be set or cleared and is preserved. This flag is not ensured at the network level through cryptographic mechanisms. Instead, a flag is just set to indicate that the file is 'executable'.
- Group modes are irrelevant and set to zero.
- Others read/write access modes can be set to make the object readable/writable for all. See World-readability/writability for more information.
Create a group
Infinit supports the concept of groups i.e a collection of users. Such groups ease the process of access control management by allowing a user to re-reference groups of users.
Each group is identified by a unique name, and can be created by any user in the network. It stores a list of group members that can be users and other groups, resulting in hierarchical groups. A group's member list can be modified only by the users administrating the group. By default only the user who created it is the administrator of the group. Below is shown an example of group creation:
$> infinit acl group --create --name marketing --path .
NOTE: The ‑‑path option must be provided for the infinit acl to know which volume, hence network, you want the group to be created in. You can use the ‑‑path option to reference the volume's mountpoint or any of its files/folders.
From that point, it is very easy to display information on a group using the ‑‑show action:
$> infinit acl group --show --name marketing --path .
{"admins":["alice"],"members":["@marketing","alice"]}
Once created, a group can be added to any object's ACLs using infinit acl set. The process is the same as granting access to a user except that the group name must be prefixed with an '@' character:
$> infinit acl set --mode rw --user @marketing --path /mnt/shared/awesome.txt
Add/remove group members
Any group administrator can add and remove members through the ‑‑add and ‑‑remove options. In the example below, Alice first adds Bob as a member of her Marketing group. Then, Alice creates a group named "marketing/tokyo" and adds it to her Marketing group.
$> infinit acl group --name marketing --add-user bob --path .
$> infinit acl group --create --name marketing/tokyo --path .
$> infinit acl group --name marketing --add-group marketing/tokyo --path .
The "marketing/tokyo" group could also be added or removed using the ‑‑add or ‑‑remove option and a '@' prefix before the group name:
$> infinit acl group --name --marketing --add @marketing/tokyo --path .
Add/remove group administrators
A group can be administered by multiple users at once, increasing the flexibility of the group concept a bit more. To add/remove administrator to a group, simply rely on the ‑‑add-admin and ‑‑remove-admin actions:
$> infinit acl group --name marketing --add-admin bob --path .
$> infinit acl group --show --name marketing --path .
{"admins":["alice","bob"],"members":["@marketing","alice","bob"]}
As before, administrators can be added and removed using the ‑‑add and ‑‑remove option with a '^' prefix:
$> infinit acl group --name marketing --add ^bob --path .
Device
Log in on another device
You may wish to access your infrastructure from another machine. The critical nature of the user's identity (which is similar to an SSH key) makes this operation more complex than the others.
In a nutshell, one needs to re-create his/her Infinit environment with all the resources (users, networks, volumes, drives etc.) on the other computer. If you are using Infinit in a completely decentralized manner, then the operation of exporting all the objects manually and re-importing them on the other device will be familiar. If you have gotten used to the ease-of-use of the Hub, then we offer you two methods to transmit your user identity to another device.
Note that the preferred method when using the command-line tools should be to transmit the user identity to another device.
Store the user identity on the Hub
The easiest (but least secure) way to retrieve your user identity on another device is to activate a mode in which your private identity is kept on the Hub, encrypted with a key to protect it from potential intruders.
To activate this mode, you need to specify the ‑‑full option when signing up on the Hub, along with a password, as shown below. Note that the password can be provided in-line using the ‑‑password option or entered when prompted:
Device A$> infinit user signup --name alice --fullname Alice --full
Password: ********
Remotely saved user "alice".
Following this operation, one can login on another device very simply by invoking the ‑‑login option:
Device B$> infinit user login --name alice
Password: ********
Locally saved user "alice".
That's it, you can see by listing the local users that your private user identity has been retrieved:
Device B$> infinit user list
alice: public/private keys
NOTE: If you already registered your user on the Hub but would like to activate this login mode, you can remove your user from the Hub with the pull option and then re-push with the ‑‑full option along with a password.
Transmit user identity to another device
If you are uncomfortable with us keeping your user identity, there is another (preferred) way for you to transmit your user identity to another machine.
The method relies on the Hub as a temporary store for your user identity to be kept until it is retrieved on another device. If not retrieved after 5 minutes, the user identity will be removed from the Hub. The user identity is also encrypted with a key of your choice so that we cannot access it. In the future, a direct point-to-point method will be used to bypass the Hub altogether.
Device A$> infinit device transmit --as alice --user
Passphrase: ********
Transmitted user identity for "alice".
User identity on the Hub for: 297 seconds
Once the command has been launched, you have 5 minutes to retrieve the user identity on another device using the following command:
Device B$> infinit device receive --user --name alice
Passphrase: ********
Received user identity for "alice".
You can verify that the user has been saved locally by listing the local users:
Device B$> infinit user list
alice: public/private keys
Once retrieved, the user identity is removed from the Hub. Even though this method is not ideal, it is a fair compromise between security (short window of attack, encrypted with a unique key of your choosing etc.) and simplicity (two commands to invoke, no file to manually move around etc.).
Manually export/import the user identity
For users that either do not trust the two methods above or who are using a completely decentralized environment, there is another method which can be used. This requires exporting the full user identity, moving the file manually and finally re-importing it on the new device.
First, export the user identity to a file:
Device A$> infinit user export --name alice --full --output alice.user
WARNING: you are exporting the user "alice" including the private key
WARNING: anyone in possession of this information can impersonate that user
WARNING: if you mean to export your user for someone else, remove the --full flag
Exported user "alice".
$> cat alice.user
{"fullname":"Alice","id":"2J8reEAY","name":"alice","private_key":{"rsa":"MIIEp...M/w=="},"public_key":{"rsa":"MIIBC...DAQAB"}}
At this point, it is your responsibility to move the file to your other device, using SCP for instance. Re-creating the user entity the just requires an import:
Device B$> infinit user import --input alice.user
Imported user "alice".
Drive
Once you've created your storage infrastructure comprising of a network, silos and volumes, you may wish to invite other users, potentially non-tech-savvy, to use it to seamlessly store and access their files.
A client application with a graphical interface called Infinit Drive is provided for end-users to see the drives they are allowed to access, the people contributing to it, their permissions, etc.
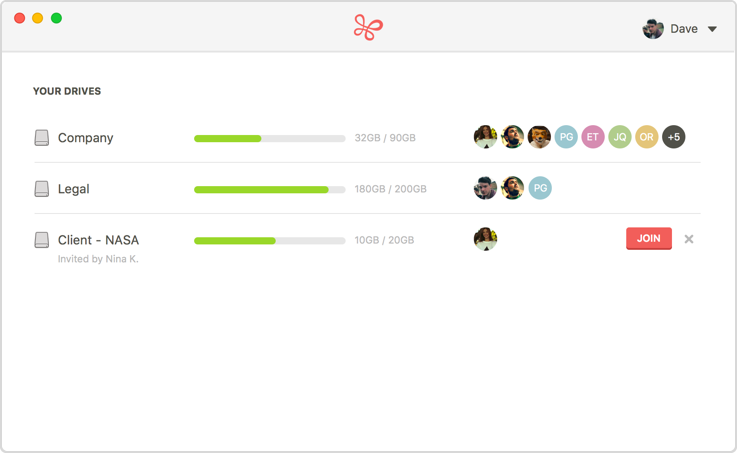
The notions of silos, networks and volumes are too technical for most end-users. Such users may also require a simple email guiding them through the set-up process.
This is why the notion of a drive has been introduced. A drive is nothing more than an abstraction on top of a volume. In other words, a drive is a volume that will show up in the Infinit Drive's interface.
The volume/drive distinction has been introduced to avoid listing all the volumes in the graphical user interface (GUI). Let us recall that as many volumes as one wants can be created in a network. As such, a network could contain a thousands volumes that have very specific purposes and that most users of the networks are not supposed to use.
As such, the network administrator can define the volumes that will be usable by non-tech-savvy users. These volumes are referred to as drives. As a result, only the drives a user has been invited to will be displayed in the GUI, receiving an email detailing how to install the application and join/use the drive.
Create a drive
Creating a drive is as easy as any other operation. The following creates a drive named "workspace" based on the network "cluster" and volume "shared".
$> infinit drive create --as alice --network cluster --volume shared --name workspace --description "Alice's, Bob's, Charlie's and Dave's workspace" --push
Locally created drive "alice/workspace".
Remotely saved drive "alice/workspace".
Note that the ‑‑push option is included to push the drive to the Hub so that it is easily retrievable by the other users, in particular the ones that we will be inviting to join.
List the drives
As for the other resources, one can very simply list the local drives. Note that refreshing the local snapshots can be achieved with the fetch action:
$> infinit drive fetch --as alice
Fetched drives for user "alice".
$> infinit drive --list
alice/workspace: ok
Invite users
There are two ways to invite users to join a drive depending on the fact that the user already has an Infinit account i.e user identity.
Existing users (by public identity)
Before you can invite a user to a drive, you need to be able to reference him/her. For that, you need to fetch his/her public identity using the infinit user fetch command (assuming you are using the Hub).
Every user that will be invited must have been issued a passport to connect to the network. Since creating a passport for many users may be cumbersome, a ‑‑passport option is provided to the infinit drive binary in order to automatically create any missing passport.
The sequence of commands below shows how to invite both Bob and Charlie. Note that the user Bob has already been fetched locally and has already been issued a passport. However, Charlie is a freshly created user for whom no passport has been created.
$> infinit user -fetch --as alice --name charlie
Fetched user "charlie".
$> infinit drive invite --as alice --name workspace --user bob --user charlie --passport --push
Locally created passport "alice/cluster: charlie".
Locally created invitation for "bob".
Locally created invitation for "charlie".
Remotely saved passport "alice/cluster: charlie".
Remotely saved invitations "alice/workspace: bob, charlie".
That's it, Bob and Charlie have been invited to join the drive named "alice/workspace". Following the ‑‑push of the invitations, an email is sent to notify each invited user of their invitation and letting them know how to proceed.
If you would like to prepare invitations locally and push them all later, you can do this by omitting the option ‑‑push in the previous sequence of commands and later call the command as shown below:
$> infinit drive invite --as alice --name workspace --push
Remotely saved invitations "alice/workspace: bob, charlie".
Without any ‑‑user specified, the invite command will push each pending invitations to the Hub, sending the notification emails as a consequence.
Non-existing users (by email)
Inviting users who do not already have an Infinit account is a bit more complicated because the process of generating the invited user's key pair is deferred.
The whole problem related to inviting non-existing users is that such users do not have a user identity yet, hence cannot be referenced. As a result, creating a passport, granting the invitee accesss to directories/files or adding the invitee to a group cannot be achieved at the time of the invitation.
When invited, a user receives an email and is likely to install the Infinit Drive application. At this point the invitee will register i.e create a user identity. It is at this time in the process that the invitee can be referenced through its public identity.
As the network administrator, you could invite users by email, wait for them to create an account and then manually issue a passport, grant access to some folders etc. once you notice the invitee has registered. The problem is that the invitee would not understand why, once the application installed, they have to wait to be able to access the drive.
If, as the network administrator, you want the experience to be as smooth as possible, here are some possible solutions:
- Access Control: To ensure that invited users have access to the drive immediately following their registration, a solution is to create a volume with read-write default permissions. Alternatively, you could mount the volume and set world read-write permissions for everyone to have access to the files in the volume, at least to the root directory for the invitee to be able to list its contents.
- Passport: The passport needs to be generated following the invitee's registration. Currently, the only way to do that is to delegate the passport creation to the Infinit Hub. Because the Hub will be notified of the user's registration, it will be able to act accordingly by generating the passport right away.
The following demonstrates how to delegate the passport creation to the Hub for a passport to be generated following the invited user's registration:
$> infinit user fetch --as alice --name hub
Fetched user "hub".
$> infinit passport create --as alice --network cluster --user hub --allow-create-passport --push
Locally created passport "alice/cluster: hub".
Remotely saved passport "alice/cluster: hub".
The Hub's user then needs to be registered to the network. This requires that the volume is mounted so that the infinit acl binary can be used to write the block.
$> infinit volume mount --as alice --name shared --mountpoint /mnt/shared/ --publish
...
$> infinit acl register --network cluster --user hub --path /mnt/shared/
Users can now be invited using their email addresses. They will receive an email asking them to install the graphical client and sign up. Note that the Hub will only generate their passport once they have confirmed their email address.
$> infinit drive invite --as alice --name workspace --email dave@company.com --push
Locally created invitation "alice/workspace: dave@company.com".
Remotely saved invitation "alice/workspace: dave@company.com".
Join a drive
Even though the drive abstraction has been introduced for users of graphical interface, you can decide to join a drive through the command-line tools.
First, remember to update your local drive descriptors by fetching the drives you've been invited to and already have access to. Once fetched, you can list the drives you have locally.
$> infinit drive fetch --as charlie
Fetched drive for user "charlie"
$> infinit drive list --as charlie
alice/workspace
You can then join a drive using the following command:
$> infinit drive join --as charlie --name alice/workspace
Joined drive "alice/workspace".
That's it, you are now allowed to mount the volume (i.e. 'alice/shared') associated with the drive to browse, store and access files. Note that you could have done that without using through the drive invitation process because you are using the command-line tools. Non-tech-savvy users, however, will appreciate having an interface with only the drives they have been invited to join and thus have access to.
Pull a drive
A drive can be pulled from the Hub using the pull mode. The ‑‑purge option is kept for consistency but currently has no effect.
Delete a drive
To locally delete a drive, the ‑‑delete mode is used. This can be combined with the ‑‑pull option to remove the drive from the Hub. The ‑‑purge option is kept for consistency but currently has no effect.
LDAP
This binary is only provided in the Enterprise version of the Infinit storage platform. Please contact us to schedule a demo or talk to a sales representative.
Monitor
This binary is only provided in the Enterprise version of the Infinit storage platform. Please contact us to schedule a demo or talk to a sales representative.
Journal
When running a network or volume with the asynchronous option ‑‑async, operations are written to the local disk before being sent to the storage nodes. This ensures a better end user experience by not exposing them directly to the network latency or bandwidth.
The infinit journal binary provides the means for checking the status of the asynchronous write buffer, also known as journal.
Check asynchronous network cache
In order to check the number of pending asynchronous operations and/or the amount of data remaining to be sent to the storage nodes, you can use the stat command.
$> infinit journal stat --as alice --network alice/cluster
alice/cluster: 185 operations, 71 MB

Talk to us on the Internet!
Ask questions to our team or our contributors, get involved in the project...