
Get Started
Before proceeding, this guide uses the Infinit command-line tools with a terminal window. You don’t need to be a UNIX guru but you should be familiar with typing shell commands and interpreting outputs.
The following is written for users of Windows. If you are not using this platform, please refer to the Linux or macOS guide.
Installation
Install Infinit’s dependencies
![]()
Infinit relies on dokany to create filesystems in userland. You will need to install it from the link below:
NOTE: Infinit currently requires a 64 bit version of Windows 7, Windows 8 or Windows 10.
Install the Infinit command-line tools
![]()
Click the link below to download the Infinit command-line tool:
Extract the ZIP file to a folder of your choice.
Using the command line, navigate into the directory where Infinit was extracted.
> cd C:\Users\%USERNAME%\Downloads\infinit-0.8.0
> dir- The
binsubdirectory contains the actual Infinit binary infinit.exe.
Create Infrastructure
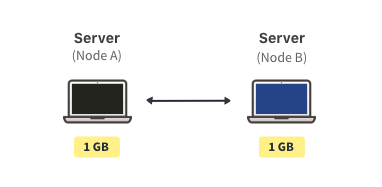
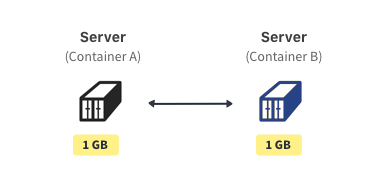
It is now time for you to create your own storage infrastructure. What follows is a step-by-step guide to set up infrastructure for a single user with two devices (named A and B). One of the devices will contribute storage capacity to store the blocks of data composing the files while the second device will read and write blocks over the network. This creates an NFS-like system even though it is also possible to create infrastructure where more than one node stores blocks. Subsequently, another user will be invited to join the storage infrastructure to show how to control permissions and more.
NOTE: For more information to learn how to set up completely decentralized infrastructure, how to plug cloud storage services such as AWS S3, Google Cloud Storage etc. or how to invite non-tech-savvy users to join and use storage infrastructure to store and access files as usual, you can skip this tutorial and refer directly to the reference documentation.
First, add the bin directory to the PATH environment variable to be able to invoke the command-line tools from anywhere:
> set PATH=%CD%\bin;%PATH%
Create a user
The first step consists of creating a user on the Hub. The Hub is a cloud service whose role is to ease the process of discovery, sharing and more, more about it here.
All the commands that follow use the user name alice but you should pick your own unique user name:
Device A> infinit.exe user signup --name alice --fullname "Alice"
Generating RSA keypair.
Remotely saved user "alice".
Create a silo
A silo behaves like a hard disk, storing data blocks without understanding the data’s meaning. The beauty of Infinit is that it is completely agnostic of the nature of such silo.
Next, we are going to declare a local silo. A local silo stores data blocks as files in a directory (such as C:\storage\infinit) on the local filesystem.
The binary infinit silo is used for this purpose. The filesystem sub mode is used to indicate that the storage will be on the local filesystem:
Device A> infinit.exe silo create filesystem --name local --capacity 1GB
Created storage "local".
Create a network
Now that we have at least one silo to store data, we can create a network interconnecting different machines.
The infinit network command is used to create the network, specifying a name along with the list of silos to rely upon. We will ignore the other options now but you can read about them in the reference documentation. In this example, only the local silo is used but you could plug as many as you like. Obviously, you need to substitute alice with your username:
Device A> infinit.exe network create --as alice --storage local --name my-network --push
Locally created network "alice/my-network".
Remotely saved network "alice/my-network".
NOTE: The --push option is used to publish the created network (likewise for other objects) onto the Hub for it to be easily fetched on another device or shared with other users.
Create a volume
The last step on this device consists of creating a logical volume to store and access files through a file system interface. Volumes can be manipulated through the infinit volume binary as shown next:
Device A> infinit.exe volume create --as alice --network my-network --name my-volume --push
Locally created volume "alice/my-volume".
Remotely saved volume "alice/my-volume".
That’s it, you’ve created a volume named my-volume i.e. a filesystem. The blocks that the files are composed of will be distributed across the network named my-network, currently composed of a single computer with a single silo.
Mount the volume
For now, only configuration files have been created. Nothing has been run. Let’s start the server and access the volume by mounting it through FUSE, as easily as any other filesystem:
Device A> infinit.exe volume mount --as alice --name my-volume --mountpoint z: --allow-root-creation --cache --publish
Running network "alice/my-network".
Fetched endpoints for "alice/my-network".
Running volume "alice/my-volume".
...
NOTE: This command does not return. You can make it run in the background if you prefer. To stop it and unmount the volume, just hit CTRL^C or interrupt the process. You should wait until the end of the guide to stop this process though.
Device A> infinit.exe volume mount --as alice --name my-volume --mountpoint z: --allow-root-creation --cache --publish &
Running network "alice/my-network".
Fetched endpoints for "alice/my-network".
Running volume "alice/my-volume".
...
NOTE: We're running this command in the background so we can continue working on this container.
That’s it! You can now create, list and access files from the mount point z:\. Try creating a file right now:
Device A> echo "everything is" > z:\awesome.txt
> type z:\awesome.txt
everything is
Access from another machine
Now that you have successfully created and mounted a volume on your machine, it would be interesting to access the data from your other devices. If you don’t have another device, you can simulate another device by opening another terminal and setting INFINIT_HOME to a different directory.
In order to access your volume from another device, you will need to transfer your user’s identity to that device.
Now that you have successfully created and mounted a volume on your container, it would be interesting to access the data from another container. Open a new terminal and repeat the installation steps from earlier.
In order to access your volume from another container, you will need to transfer your user’s identity to that container.
A user’s identity is analogous to an SSH key pair and should be treated in the same way. Because of its critical nature, it is not stored on the Hub like network and volume descriptors could be for instance. For this guide, we will rely on the Hub to transmit the identity in encrypted form to the other device.
Let’s transmit the user’s identity to the other device. Note that it will be encrypted with a passphrase chosen by you. Also you will only have 5 minutes to retrieve it on device B.
Device A> infinit.exe device transmit --user --as alice
Passphrase: ********
Transmitted user identity for "alice".
User identity on the Hub for: 297 seconds
Now let’s move to device B. First, you need to download, install and configure the Infinit command-line tools on this new device as you did for device A. Please refer to the first sections of this guide for that purpose.
Device B> infinit.exe device receive --user --name alice
Passphrase: ********
Received user identity for "alice".
NOTE: The pairing process may have expired on device A. If so, please try again and enter the passphrase on device B in order to retrieve your user identity before the counter runs down.
The next steps consist of fetching the resources that you previously pushed on the Hub: network and volume.
Device B> infinit.exe network fetch --as alice --name my-network
Fetched network "alice/my-network".
infinit.exe volume fetch --as alice --name my-volume
Fetched volume "alice/my-volume".
Let’s link this device to the my-network network you created on device A for this new device to be authorized to connect.
Device B> infinit.exe network link --as alice --name my-network
Linked device to network "alice/my-network".
Finally, the volume can be mounted on device B as simply as on device A:
Device B> infinit.exe volume mount --as alice --name my-volume --mountpoint z: --cache --publish
Fetch endpoints for "alice/my-network".
Running network "alice/my-network".
Running volume "alice/my-volume".
...
It is now time to check if the file you created on device A is synchronized with device B:
Device B> dir z:
awesome.txt
type z:\awesome.txt
everything is
That’s it, you’ve created a volume that you quickly connected to two devices, without having to go through a complicated administrative process, and you mounted it through a FUSE interface.
Share the volume
We can now proceed a step further by allowing another user to connect to Alice's storage infrastructure and access/edit the files in the volume alice/my-volume.
First, let us create another user, unconventially named Bob, on a new container. Run another container by repeating the steps from earlier, then create your new user:
First, let us create another user, unconventially named Bob, on a completely new device C. As mentioned earlier, if you don't have another device available, you can simulate one through the use of the INFINIT_HOME environment variable.
Device C> infinit.exe user signup --name bob --fullname "Bob"
Generating RSA keypair.
Remotely saved user "bob".
In order for another user (e.g Bob) to be able to connect to someone else's storage infrastructure, a passport is required. Only the infrastructure owner, in this case Alice, can issue such passports through the use of the infinit passport binary.
Back to device A and Alice to generate a passport for Bob. Note that in order to reference another user by its name, for generating a passport for instance, you first need to retrieve his/her user public identity from the Hub (or otherwise).
Device A> infinit.exe user fetch --as alice --name bob
Fetched user "bob".
> infinit.exe passport create --as alice --network my-network --user bob --push
Locally created passport "alice/my-network: bob".
Remotely saved passport "alice/my-network: bob".
Now that a passport has been issued, Bob can very easily retrieve it from the Hub in order to join Alice's storage network. For this, Bob must fetch Alice's public user identity, Alice's alice/my-network network descriptor along with the freshly issued passport:
Device C> infinit.exe user fetch --as alice --name bob
Fetched user "alice".
infinit.exe network fetch --as bob --name alice/my-network
Fetched network "alice/my-network".
infinit.exe passport fetch --as bob --network alice/my-network
Fetched passport for "alice/my-network".
With all the pieces fetched from the Hub, Bob can now link his current device C to Alice's storage network alice/my-network:
Device C> infinit.exe network link --as bob --name alice/my-network
Linked device to network "alice/my-network".
Once his device linked to the network, Bob can now mount Alice's volume. Note that the volume descriptor alice/my-volume must first be retrieved from the Hub in order for it to be mounted:
Device C> infinit.exe volume fetch --as bob --name alice/my-volume
Fetched volume "alice/my-volume".
> infinit.exe volume mount --as bob --name alice/my-volume --mountpoint z: --cache --publish
Running network "alice/my-network".
Fetched endpoints for "alice/my-network".
Running volume "alice/my-volume".
...
Bob can now try to access the mounted volume as shown below:
Device C> dir z:
Access is denied.
As you can see, Bob cannot access Alice's volume because he has not been granted the permission to browse the root directory of alice/my-volume. Indeed, Infinit provides two layers of protections: passports prevent unauthorized computers to communicate with the servers of your storage infrastructure while an access control mechanism is provided to authorize other users to access/modify specific files and directories within a volume.
This lack of permission can be verified on Alice's device A, through the infinit acl binary which can be used for access control purposes:
Device A> infinit.exe acl list --path z:\
z:\:
        alice: rw (owner)
For Bob to access the file awesome.txt located in the volume, Alice needs to grant him access on both the root directory and the file itself:
Device A> infinit.exe acl set --mode r --user bob --path z:\
> infinit.exe acl set --mode r --user bob --path z:\awesome.txt
> infinit.exe acl list --path z:\
z:\:
  inherit: no
        alice: rw (owner)
        bob: r

z:\awesome.txt:
        alice: rw (owner)
        bob: r
NOTE: One could have relied on the --traverse option to grant read permission on all the directories leading to the target object. In other words, the following would have achieved the same result infinit acl --set --mode r --user bob --traverse --path z:\awesome.txt.
Bob should now be able to browse the volume's root directory and read its file. Note however that he should not be able to modify it since Alice did not grant Bob the permission to write the file:
Device C> infinit.exe acl list --path z:\awesome.txt
z:\awesome.txt:
        alice: rw (owner)
        bob: r
> type z:\awesome.txt
everything is
> echo "or not" > z:\awesome.txt
Access is denied.
Download full shell script: ![]() get-started.sh.
get-started.sh.
Clean your installation
Before shutting down your containers, you can clean your installations by removing your users, networks, volumes from the Hub and locally:
> infinit user delete --as alice --name alice --pull --purgeDiagnose Problems
The infinit doctor binary is provided to automatically analyze your environment and detect common issues for you to quickly understand why Infinit may not be behaving as expected. Issues may range from incorrect permissions on some files/directories, to a router blocking UDP packets and more. The easiest way to run infinit doctor is to use the --all so as to analyze the operarting system, environment variables, networking capabilities, configuration files etc.
> infinit.exe doctor all
CONFIGURATION INTEGRITY:
[OK] Storage resources
[OK] Networks
[OK] Volumes
[OK] Drives
[OK] Leftovers

SYSTEM SANITY:
[OK] Username
[OK] Space left
[OK] Environment
[OK] Permissions
[OK] FUSE

CONNECTIVITY:
[OK] Connection to https://beyond.infinit.sh
[OK] Local interfaces
[OK] NAT
[OK] Protocols
Go Further
Notice: Some features may not be entirely developed yet, please have a look at our roadmap to follow our advancement. You can also subscribe to our newsletter to get notified of our upcoming features.
You can now have a look at our Docker integrations, authorize more users to connect to the network, to contribute additional storage i.e scale up/out, make the network resilient through redundancy and invite non-tech-savvy users to join drives through a graphical user interface. You can also keep reading the Infinit documentation through examples of deployments and/or the reference documentation:

Any question, feedback?
Come talk to us! Whether you encounter a problem setting up your infrastructure, have a question or just to give us some feedback, we're never too far away:

Talk to us on the Internet!
Ask questions to our team or our contributors, get involved in the project...